REQUEST COMPLIMENTARY SQLS*PLUS LICENCE
Installing MySQL 8 on Windows 10

We will consider in detail the process of installing the free edition of MySQL 8 Community on the Windows 10 operating system.
What is MySQL?
MySQL is a free relational database management system. MySQL development and support is provided by Oracle.
MySQL is a very popular DBMS, it is actively used on the Internet as a system for storing data on sites, in other words, the vast majority of sites on the Internet to store their data use MySQL.
Recently I have been analyzing data from several official ratings of DBMS popularity and other statistical information in order to determine which DBMS is really the most popular, and as a result, MySQL is currently the most popular DBMS in the world. You can get acquainted with all the results of my analysis in the material – TOP 5 popular database management systems.
MySQL 8 editions
MySQL 8 is released in several editions:
MySQL Standard Edition
MySQL Standard Edition is an edition with standard functionality that allows you to implement high-performance, reliable and scalable applications.
MySQL Enterprise Edition
MySQL Enterprise Edition – this edition includes full functionality and a set of additional tools that are designed to achieve the highest scalability, security and reliability.
MySQL Cluster Carrier Grade Edition
MySQL Cluster (CGE) is a distributed database that combines linear scalability and high availability. It is designed for critical applications.
MySQL Community
MySQL Community Edition is a free edition, which can be downloaded absolutely freely from the official MySQL website. The Editorial Office supports all the necessary functionality to implement full-fledged Internet resources.
More information about MySQL Edition can be found on the official website – https://www.mysql.com/products/.
Step-by-step installation of MySQL 8 on Windows 10
Now we will take a step-by-step look at the whole process of installing MySQL 8 in Community edition on Windows 10.
Besides MySQL Server, we will also install MySQL Workbench – a tool used for database development and administration of MySQL Server.
Note! To install MySQL 8 on Windows 10 you need Microsoft .NET Framework 4.5.2 or higher.
Step 1 – Download MySQL 8 for Windows 10
To proceed to the installation of MySQL 8, you must first download the MySQL distribution kit.
You can download MySQL 8 in Community edition, as it was already mentioned, absolutely free from the official website, here is the link to the download page – https://dev.mysql.com/downloads/installer.
After going to the page you can choose how to download the distribution, we offer two ways:
- Download Web Installer – a small program that downloads all necessary components for MySQL installation. You can use it to install MySQL on computers that have the Internet;
- Download Full Installer – the MySQL distribution kit that includes all the necessary components. In this case you can use this distribution to install MySQL on a computer with or without access to the Internet. For example, you can download this file on a computer with Internet access and use it to install MySQL on another computer that has no Internet access.
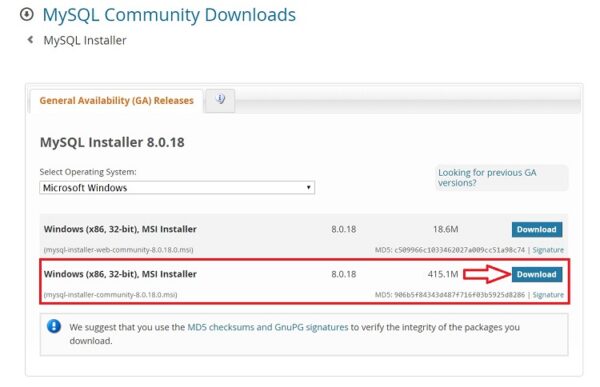
For example, let’s download the full MySQL distribution, for this click “Download” opposite the corresponding item.
Then we are asked to login using Oracle accounts, if any, or to register, thereby creating an Oracle account.
However, if you don’t want to, there is a link “No thanks, just start my download” at the bottom of the page, by clicking on which MySQL download will start immediately.
Click on this link and wait for the download to complete.
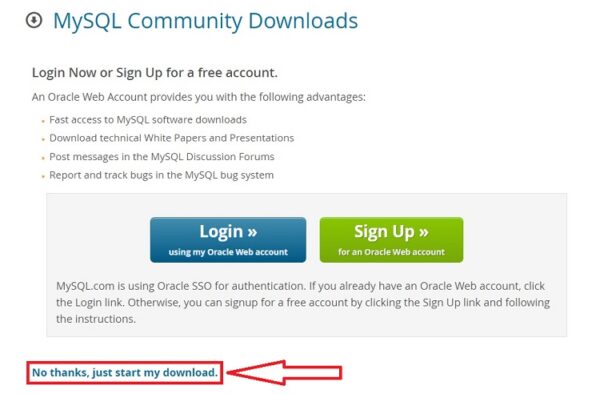
As a result, you should download the mysql-installer-community-8.0.18.0.msi file, which is about 415 megabytes in size.
Step 2 – Run the installation and choose MySQL installation type
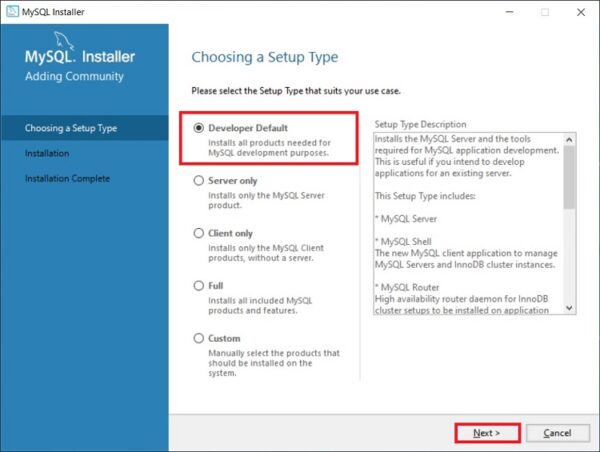
Then we launch the downloaded file and the MySQL installer will be launched. First we choose the type of installation.
We’re being offered several options:
- Developer – is the default option, it assumes installation of all that a developer needs, this is both MySQL Server and MySQL Workbench and other tools for working with MySQL;
- Server Only – this option assumes installation of MySQL server only;
- Client Only – this option assumes installation of the client part only to work with MySQL Server, i.e. the server part will not be installed;
- Full – install all components included in the distribution kit;
- Custom – selective installation, in this case you can install only what you need.
The default option, i.e. Developer, is suitable for most cases, especially if you are installing MySQL on your home computer for some purpose (learning MySQL, learning SQL, etc.).
I leave this option, click “Next”.
Step 3 – Checking and installing additional components
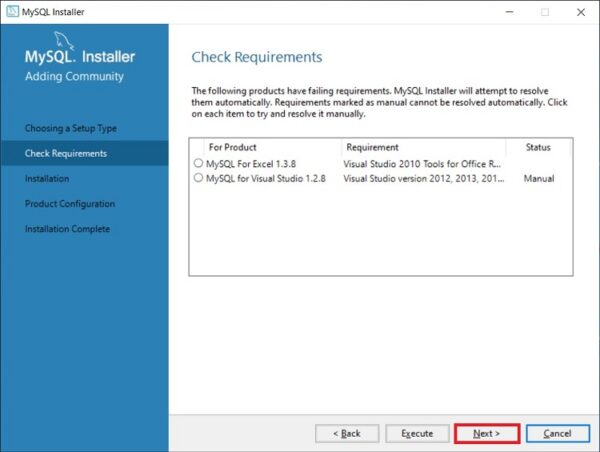
The installer will then check the system for components that are required for some MySQL extensions to work.
In my case the installer generated two warnings for MySQL For Excel and MySQL For Visual Studio extensions.
If you plan to use these components, you need to eliminate these warnings. To do that, you in turn need to install these components (i.e. select them and press “Execute”, some of them can be installed automatically).
However, if you will not use MySQL For Excel and MySQL For Visual Studio extensions, you can press “Next” right away.
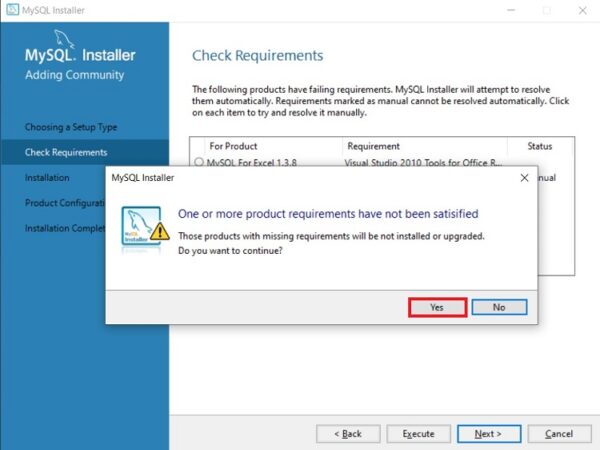
The installer will warn you if some components are missing by clicking “Yes”.
Step 4 – Installing MySQL components
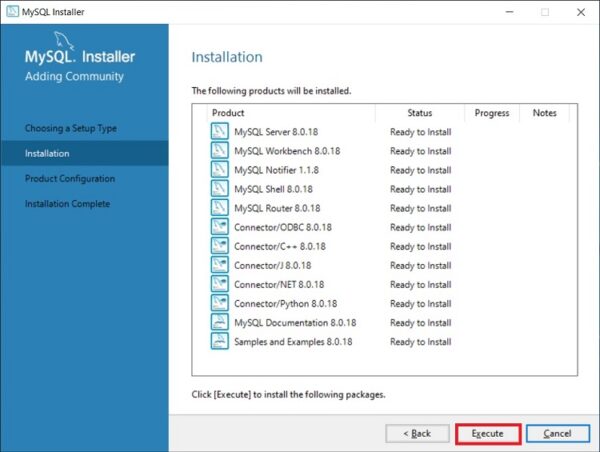
Everything is ready for MySQL installation, at this step the installer will display all MySQL components that are ready for installation, click “Execute”.
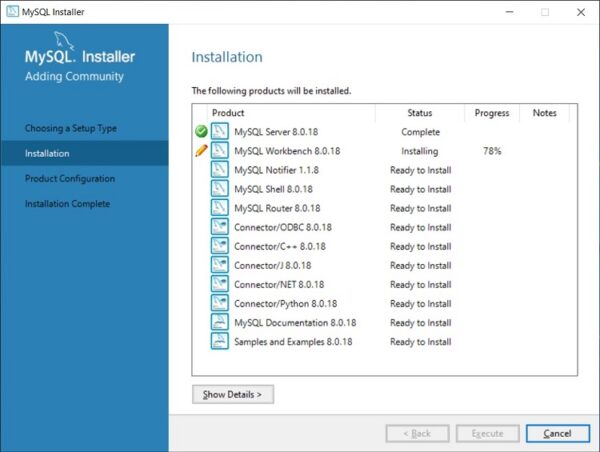
As a result, the serial installation of MySQL components will begin.
Step 5 – Finishing the MySQL component installation
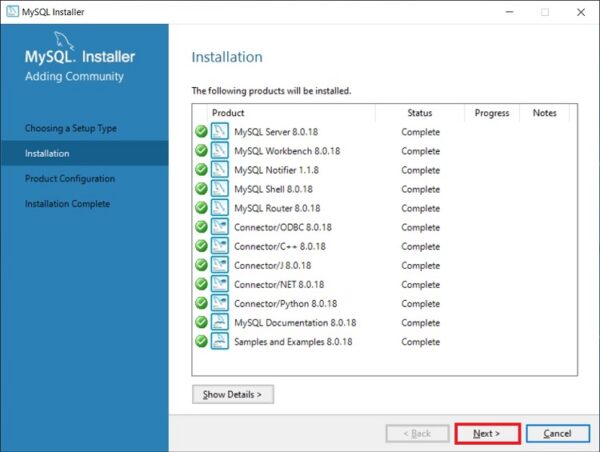
When a green checkmark appears opposite each item, the setting is complete. Press “Next”.
Step 6 – Configuring MySQL components
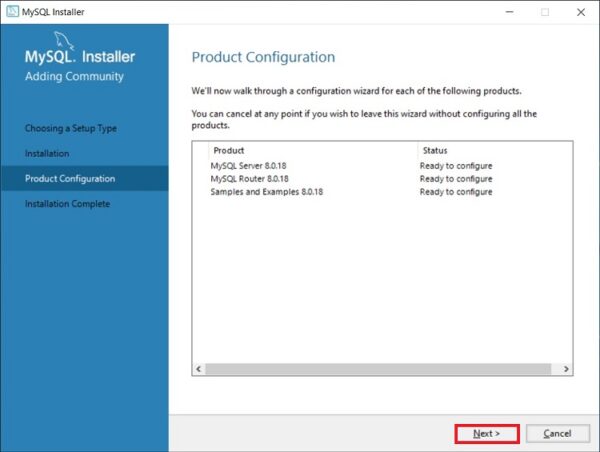
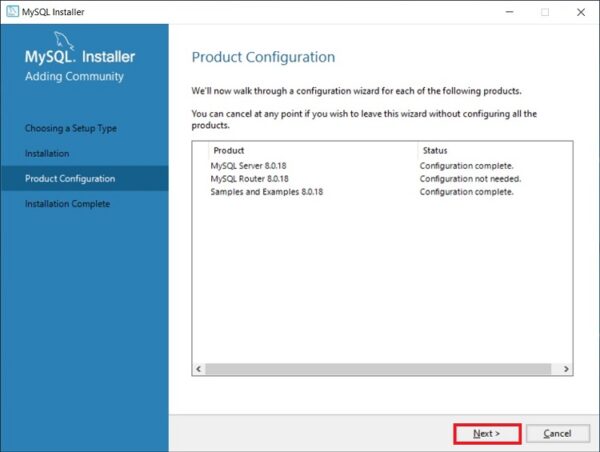
All components are installed, but not all are configured, so we need to configure them. The installer will show you which specific components you need to configure. In our case it is MySQL Server, MySQL Router and Samples and Examples. Click “Next”.
Step 7 – Configuring MySQL Server (High Availability parameter)
First of all, we need to configure MySQL Server.
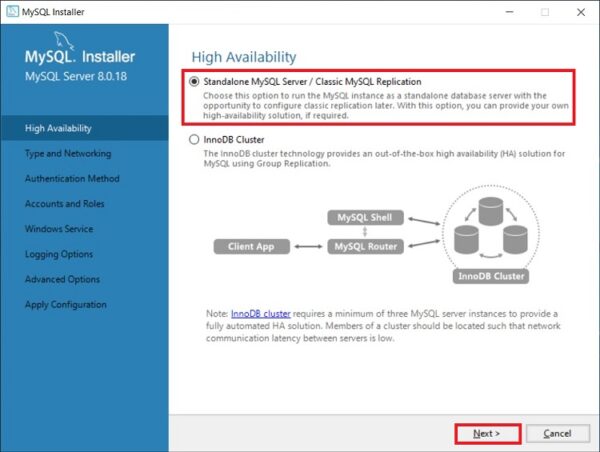
The first thing we need to do is to configure the “High Availability” parameter which is responsible for how MySQL Server will be installed.
In our case, as in most others, we need a standard “Standalone MySQL Server” – this is a classic version of MySQL Server installation.
So we select the first item and click “Next”.
Step 8 – Configuring MySQL Server (Type and Networking)
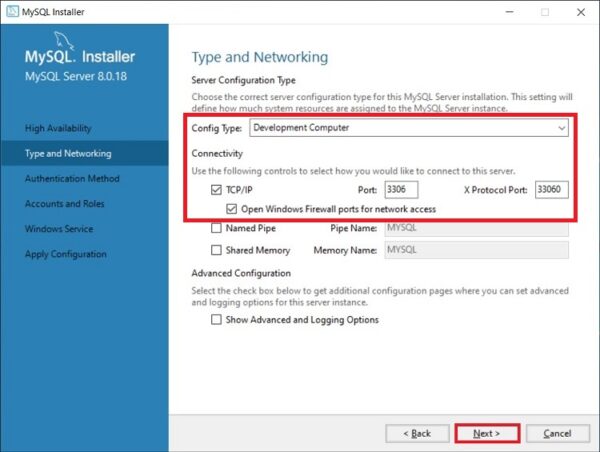
Then we configure the server type and network. In our case you can leave everything by default:
- Type – Development Computer;
- Protocol – TCP/IP;
- Port – 3306;
- Tick “Open Windows Firewall ports for network access”.
If necessary, you can fine-tune MySQL Server using advanced settings. To do this, tick the “Show Advanced and Logging Options” checkbox.
Click “Next” to continue.
Step 9 – Configuring the authentication method in MySQL Server
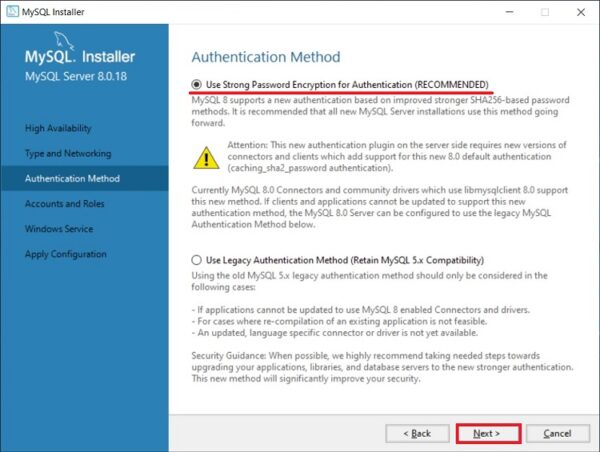
8 version of MySQL supports the new authentication method, which is recommended to use, leave it as is and click “Next”.
If necessary, you can select the second item that was used in MySQL 5.
Step 10 – Configuring MySQL Users
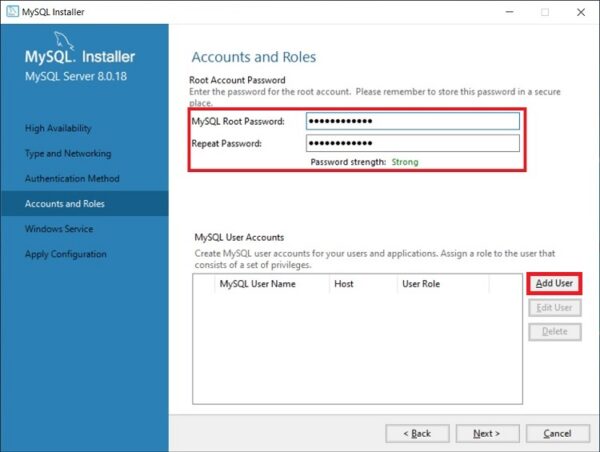
After that we need to come up with a password for user root (this is the main administrator of MySQL).
In addition, we can add more users to do this by clicking on “Add User”.
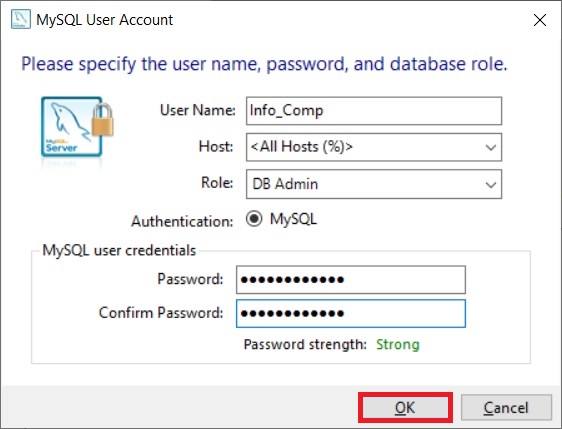
And enter the necessary data:
- User Name – enter a user name;
- Host – leave “All Hosts”;
- Role – select the role of the user;
- Password and Confirm Password – create and enter the password that this user will have.
Click “OK”.
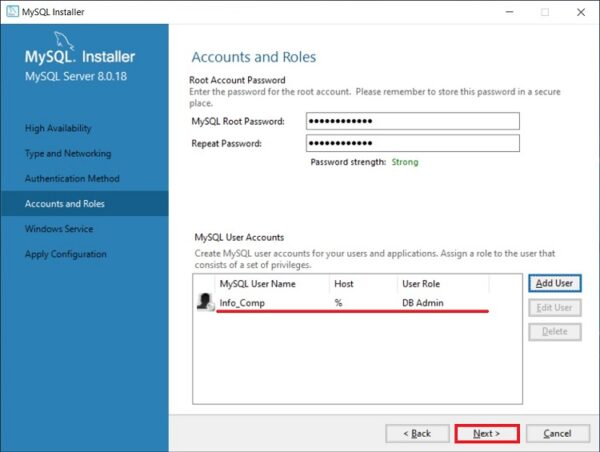
After that the user will be created.
Click “Next” to continue.
Step 11 – Configuring MySQL service in Windows
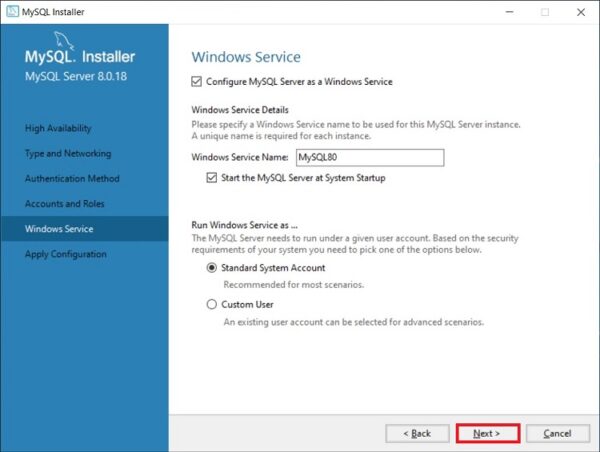
Now we need to configure the MySQL service that will work in Windows.
We can set it up:
- Windows Service Name;
- Start the MySQL Server at System Startup – if this checkbox is enabled, the MySQL service will be started when Windows starts;
- Run Windows Service – on behalf of which account MySQL service will work in Windows. Standard System Account is a system account.
You can leave it as default, that’s what I do.
Click “Next”.
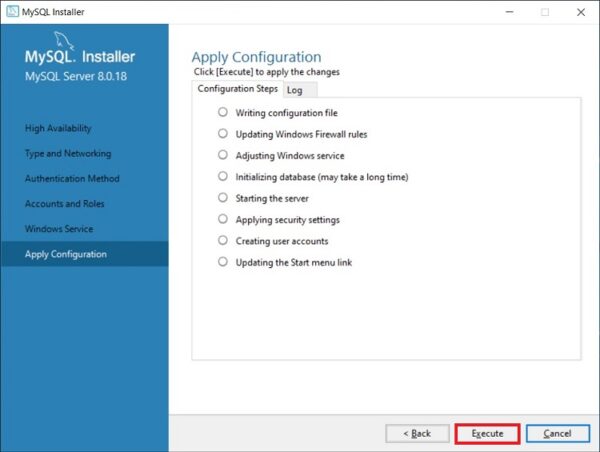
Step 12 – Applying MySQL Server settings
All MySQL Server settings are configured, but we still need to apply and save them. To do this, on the next window click “Execute”.
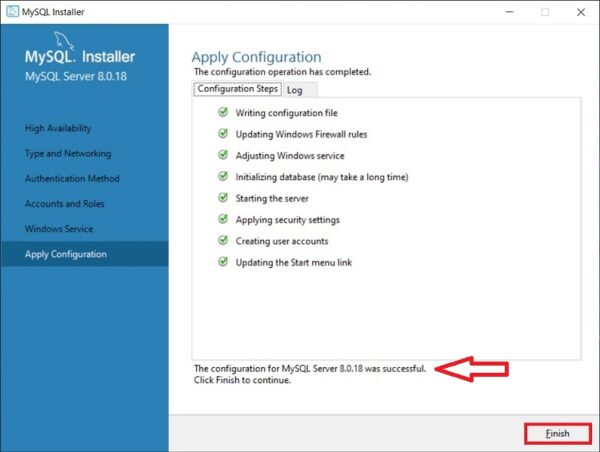
Step 13 – Finishing MySQL Server configuration
When all the checkboxes have been placed and the “Successful” message is displayed, the process will be completed, click on “Finish”.
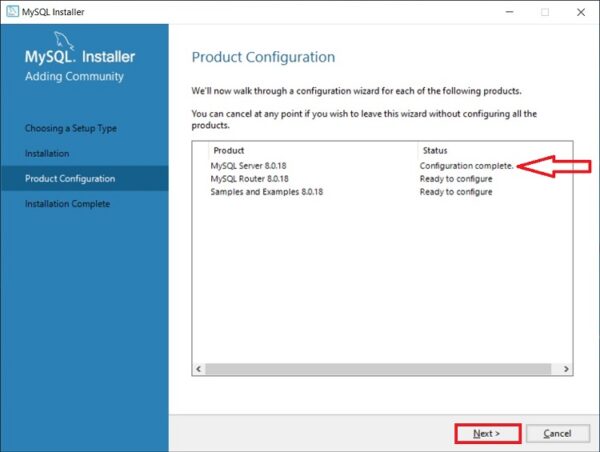
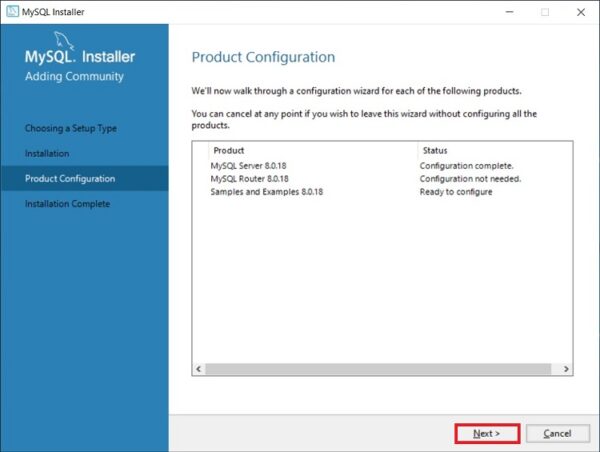
The status of MySQL Server will be changed to “Configuration complete”.
To continue configuration, click “Next”.
Step 14 – Configuring MySQL Router
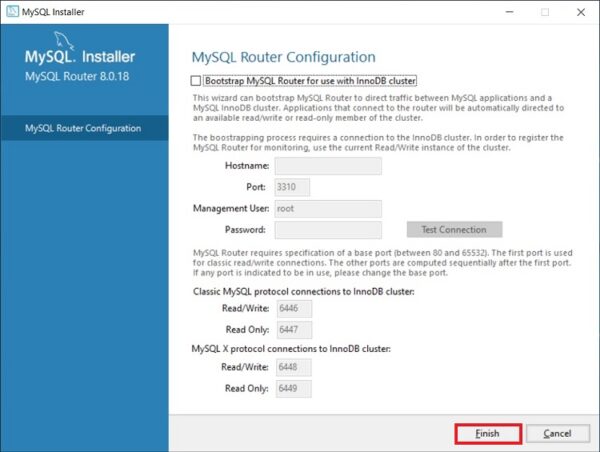
In this case, we are offered to configure the MySQL router, but it is not necessary, we can immediately click “Finish”.
Click on “Next” to proceed to the next component setting.
Step 15 – Installing test data on MySQL
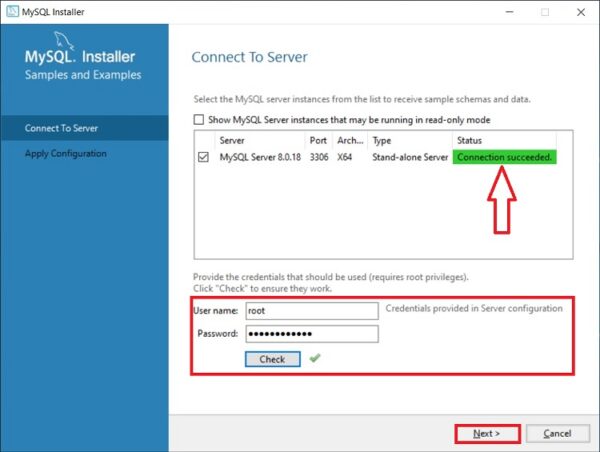
Then we can install test data on MySQL Server, for example, for training. To do this, enter the Root user password and click on “Check” to check, if the connection is established, then everything is fine and we can continue.
Click on “Next”.
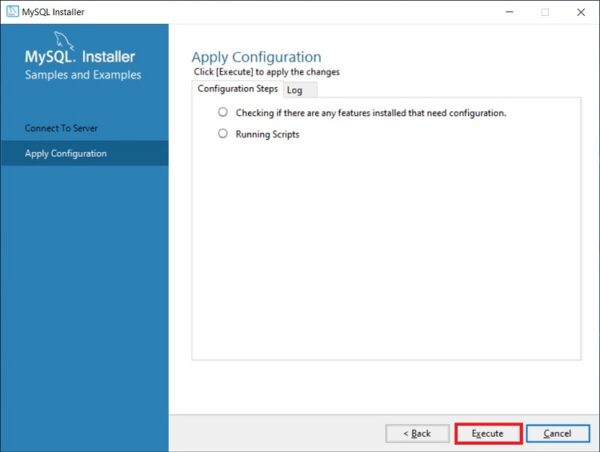
To apply all parameters and start extracting test data on MySQL Server, click “Execute”.
The process will be completed when the “Successful” message is ticked and displayed.
Click on “Finish”.
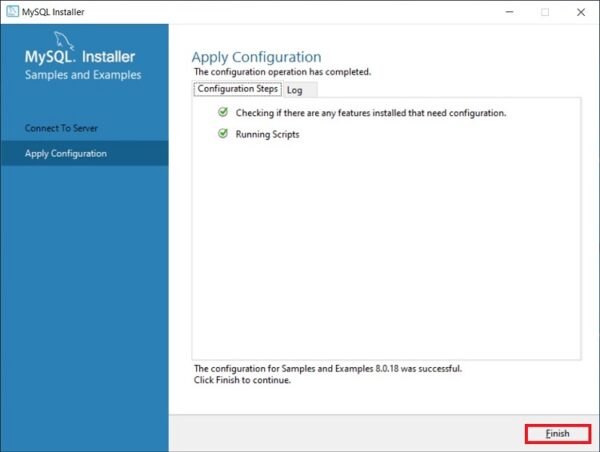
Step 16 – Finishing MySQL component configuration
All components are configured. Press “Next”.
Step 17 – Completing the entire MySQL installation and configuration process
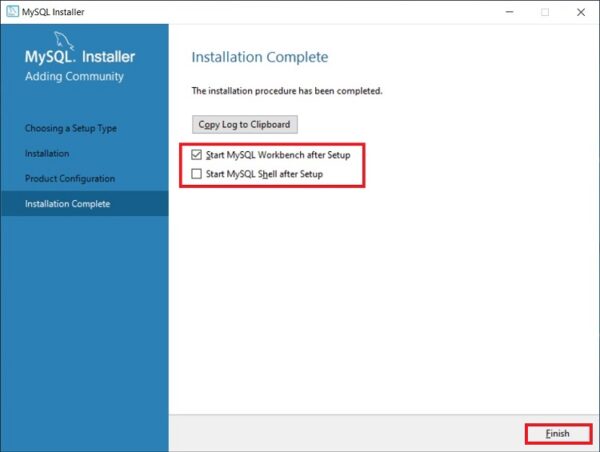
MySQL Server and all the necessary components to work with it are installed and configured: these are MySQL Workbench, and various connectors, documentation, and even a test database.
To start MySQL Workbench immediately after installation, tick the “Start MySQL Workbench after Setup” box.
Click “Finish”.
Running MySQL Workbench
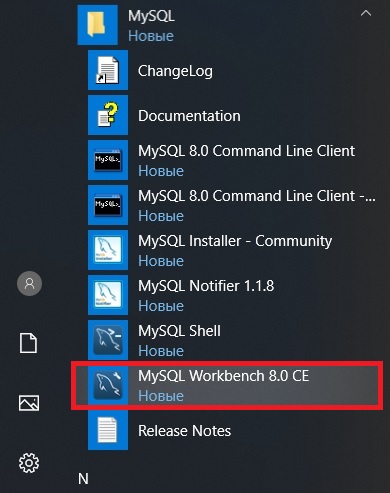
After installing MySQL, all the necessary shortcuts that you can use will appear in the Windows 10 menu.
For example, you can use the appropriate shortcut to run “MySQL Workbench 8” environment.
Connecting to MySQL using MySQL Workbench
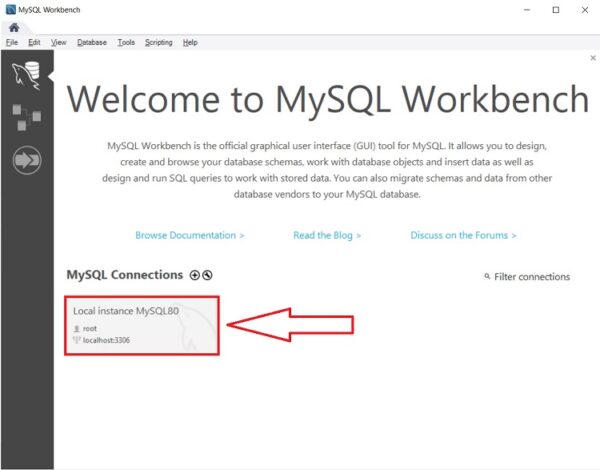
To connect to MySQL server and look at database objects, tables, views and so on, run MySQL Workbench, for example, as described above.
This will open MySQL Workbench, where on the start page we already have one connection to the local server, which will be carried out as root.
Click on it.
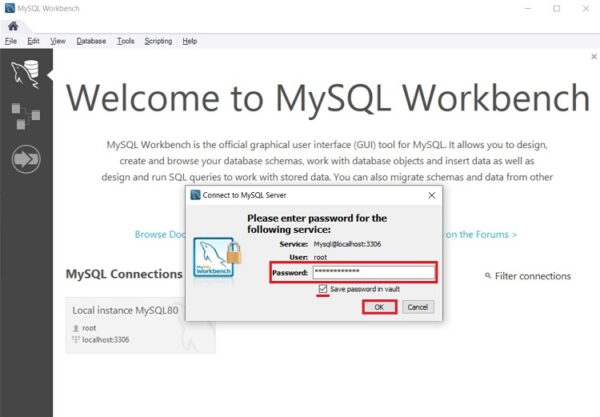
Then we enter the password to save it and not to enter it every time we connect, we can check “Save password in vault”.
Click “OK”.
As a result, we will connect to the server, and in order to view the data schema, we need to go to the “Schemas” tab in the navigator window.
In addition, we can hide unnecessary windows, to do this we can use special icons in the upper right side of MySQL Workbench.
![]()
We will see the data schema, now we can see what objects are in the database and, for example, learn to write SQL queries.
For clarity, I have hidden a side window.
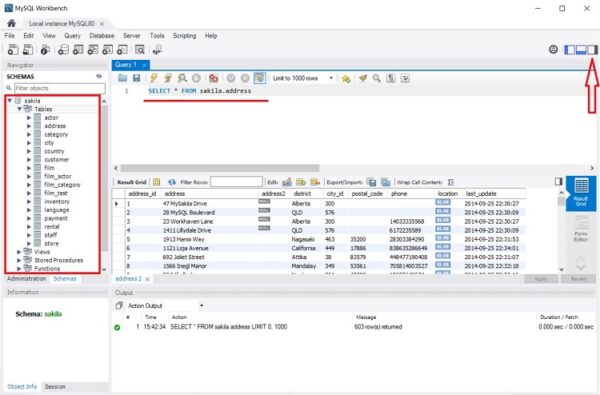
In this example, we sent a SELECT query to select data from the address table. As you can see, the data has returned and everything works.
Download & Install MySQL 8.0.11 on Windows 10 Operating System
MORE NEWS
PreambleNoSql is not a replacement for SQL databases but is a valid alternative for many situations where standard SQL is not the best approach for...
PreambleMongoDB Conditional operators specify a condition to which the value of the document field shall correspond.Comparison Query Operators $eq...
5 Database management trends impacting database administrationIn the realm of database management systems, moreover half (52%) of your competitors feel...
The data type is defined as the type of data that any column or variable can store in MS SQL Server. What is the data type? When you create any table or...
PreambleMS SQL Server is a client-server architecture. MS SQL Server process starts with the client application sending a query.SQL Server accepts,...
First the basics: what is the master/slave?One database server (“master”) responds and can do anything. A lot of other database servers store copies of all...
PreambleAtom Hopper (based on Apache Abdera) for those who may not know is an open-source project sponsored by Rackspace. Today we will figure out how to...
PreambleMongoDB recently introduced its new aggregation structure. This structure provides a simpler solution for calculating aggregated values rather...
FlexibilityOne of the most advertised features of MongoDB is its flexibility. Flexibility, however, is a double-edged sword. More flexibility means more...
PreambleSQLShell is a cross-platform command-line tool for SQL, similar to psql for PostgreSQL or MySQL command-line tool for MySQL.Why use it?If you...
PreambleWriting an application on top of the framework on top of the driver on top of the database is a bit like a game on the phone: you say “insert...
PreambleOracle Coherence is a distributed cache that is functionally comparable with Memcached. In addition to the basic function of the API cache, it...
PreambleIBM pureXML, a proprietary XML database built on a relational mechanism (designed for puns) that offers both relational ( SQL / XML ) and...
What is PostgreSQL array? In PostgreSQL we can define a column as an array of valid data types. The data type can be built-in, custom or enumerated....
PreambleIf you are a Linux sysadmin or developer, there comes a time when you need to manage an Oracle database that can work in your environment.In this...
PreambleStarting with Microsoft SQL Server 2008, by default, the group of local administrators is no longer added to SQL Server administrators during the...

